Virtualmin
Virtualmin is a FOSS (Free Open Source Software) shared hosting panel.
Supported Features
| Create | Cancel | Suspend | Unsuspend | Management | Config Options |
|---|---|---|---|---|---|
| YES | YES | YES | YES | NO | NO |
Installing Virtualmin
- Visit [Settings] > [Company] > [Modules] > Available.
- Click the "Install" button within the Virtualmin module listing.

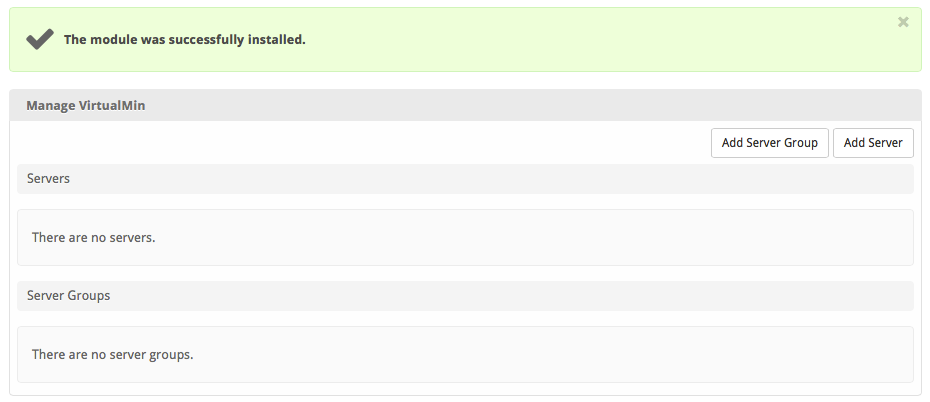
A message will be displayed, indicating that the module was successfully installed. Then click the "Add Account" button.

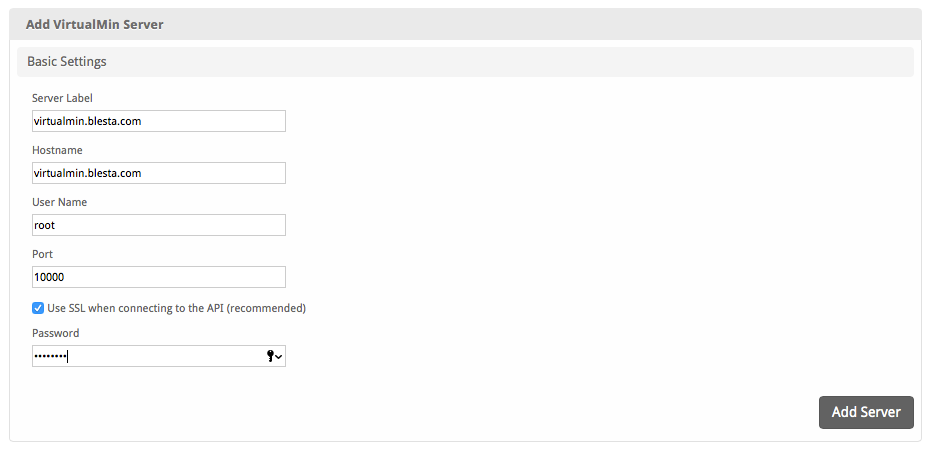
Click "Add Server" and enter your first Virtualmin server details.

| Field Name | Description |
|---|---|
| Server Label | Enter the label for your server. (e.g. "Virtualmin 1") |
| Hostname | Enter the hostname that resolves to your Virtualmin server. |
| User Name | Enter the username for your Virtualmin server (e.g. "root") |
| Port | Enter the port for your Virtualmin server (e.g. "10000") |
| Use SSL when connecting to the API (recommended) | If your Virtualmin server is using SSL/TLS over the defined port, check this box. |
| Password | Enter the password associated with the username you entered previously. |
Creating Packages
Packages define the pricing, welcome email, module and more. Packages can be assigned to Package Groups, and added to Order Forms. To create a Package, visit [Packages] > Browse, and click the "Create Package" button.
Creating a Package consists of several sections:
Basic
The Basic section consists of the following options:

| Field Name | Description |
|---|---|
| Package Name | Enter the name of this Package, it will be visible wherever services are listed and on any order forms. |
| Status | "Active" is the default, "Inactive", and "Restricted" are also available. |
| Quantity Available | If this Package has a limited quantity available, enter the quantity, or leave it as "Unlimited". |
| Description | Enter a Description for this Package. HTML is allowed, and descriptions appear on order forms. |
| Configurable Options | A Configurable Option Group may be selected if previously created. |
| Module | Select "Virtualmin" for the module. |
Module Options
The Module Options section consists of the following options, which are specific to Virtualmin
 :
:
| Field Name | Description |
|---|---|
| Server Group | You can select a server group, or a specific Virtualmin server. Select "All" if you have not created any Server Groups. |
| Server | If "All" is selected above, select the Virtualmin server to use here. |
| Virtualmin Plan | Select the plan from Virtualmin. Plans should be added through Virtualmin first, and define disk space and other restrictions. |
| Virtualmin Template | Optionally select a Virtualmin Template. |
Pricing

| Field Name | Description |
|---|---|
| Term | Enter the term for the desired pricing option. For example, if you wish to create a 3 month pricing option, enter 3 here. |
| Period | Select the period for this pricing option. "Day", "Week", "Month", "Year", and "One time" are options. The client will be invoiced every "term period", for example every 3 months if 3 is entered for term, and Month is selected for period. |
| Currency | Select the currency this pricing option is available for. |
| Price | Enter the price for this pricing option. |
| Setup Fee | If there is a setup fee, enter it here. |
| Cancellation Fee | If there is a fee to cancel early, enter it here. |
| Taxable | Check if this Package should be taxable. |
| Cancel at end of term | If the service created as a result of this Package should be automatically cancelled at the end of the term and not renew, select this option. warning Most of the time services should renew. Be careful when checking this option, it means that the service will not renew but be cancelled at the end of the original term. |
| Enable Pro rata | If you want new services to be prorated to a specific day of the month, check this option. Otherwise services will renew on the same day ordered each month, year, etc. |
Click the "Add Additional Price" to add more pricing options. It's common for people to create 1 Month, 3 Month, 6 Month, and 1 Year price options. There are many possible combinations.
Welcome Email

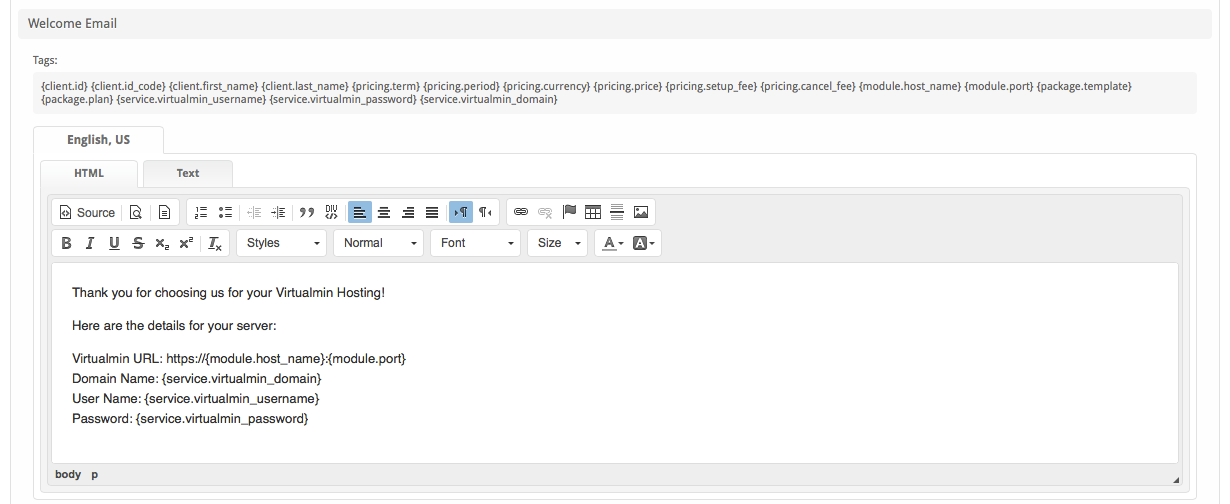
The "Tags" section describes tags that may be used in the welcome email. The welcome email content is inserted into the "Service Creation" email template under [Settings] > [Company] > [Emails] > Service Creation. Only details unique to this service should be entered into the welcome email section for the package.
Sample Email
This sample email could be used in the Package Welcome Email section to help you get started. Be sure to enter content for your welcome email in both the HTML and Text sections.
Thank you for choosing us for your Virtualmin Hosting!

Here are the details for your server:

Virtualmin URL: https://{module.host_name}:{module.port}
Domain Name: {service.virtualmin_domain}
User Name: {service.virtualmin_username}
Password: {service.virtualmin_password}
When creating or editing a package that uses this module, the following tags will be available:
| Tags | Description | Notes |
|---|---|---|
| {service.virtualmin_domain} | The domain for this Virtualmin account | e.g. "mydomain.com". |
| {service.virtualmin_username} | The username for this Virtualmin account | e.g. "mydomain" |
| {service.virtualmin_password} | The password for this Virtualmin account | |
| {module.host_name} | The hostname for your Virtualmin server | e.g. "virtualmin.domain.com" |
| {module.port} | The port for your Virtualmin server | e.g. "10000" |
Additional TagsDue to the nature of tag objects containing several fields, many of which are likely irrelevant for use in email templates, but may be useful to you in certain circumstances, a dump of the tags are shown below.
The {package} object Expand source
stdClass Object
        (
            [id] => 4
            [id_format] => {num}
            [id_value] => 4
            [id_code] => 4
            [module_id] => 6
            [name] => Virtualmin A
            [description] =>
            [description_html] =>
            [qty] =>
            [module_row] => 3
            [module_group] =>
            [taxable] => 0
            [single_term] => 0
            [status] => active
            [company_id] => 1
            [prorata_day] =>
            [prorata_cutoff] =>
            [email_content] => Array
                (
                    [0] => stdClass Object
                        (
                            [lang] => de_de
                            [html] =>
                            [text] =>
                        )

                    [1] => stdClass Object
                        (
                            [lang] => en_us
                            [html] => <p>{% debug %}</p>

                            [text] => {% debug %}
                        )

                )

            [pricing] => Array
                (
                    [0] => stdClass Object
                        (
                            [id] => 4
                            [pricing_id] => 5
                            [package_id] => 4
                            [term] => 1
                            [period] => month
                            [price] => 5.0000
                            [setup_fee] => 0.0000
                            [cancel_fee] => 0.0000
                            [currency] => USD
                        )

                )

            [meta] => stdClass Object
                (
                    [plan] => Gold
                    [template] => Default Settings
                )

            [groups] => Array
                (
                    [0] => stdClass Object
                        (
                            [id] => 4
                            [type] => standard
                            [name] => Virtualmin
                            [description] =>
                            [company_id] => 1
                            [allow_upgrades] => 1
                            [names] => Array
                                (
                                    [0] => stdClass Object
                                        (
                                            [lang] => de_de
                                            [name] => Virtualmin
                                        )

                                    [1] => stdClass Object
                                        (
                                            [lang] => en_us
                                            [name] => Virtualmin
                                        )

                                )

                            [descriptions] => Array
                                (
                                )

                        )

                )

            [option_groups] => Array
                (
                )

            [plugins] => Array
                (
                )

            [names] => Array
                (
                    [0] => stdClass Object
                        (
                            [lang] => de_de
                            [name] => Virtualmin A
                        )

                    [1] => stdClass Object
                        (
                            [lang] => en_us
                            [name] => Virtualmin A
                        )

                )

            [descriptions] => Array
                (
                    [0] => stdClass Object
                        (
                            [lang] => de_de
                            [html] =>
                            [text] =>
                        )

                    [1] => stdClass Object
                        (
                            [lang] => en_us
                            [html] =>
                            [text] =>
                        )

                )

            [plan] => Gold
            [template] => Default Settings
        )
The {service} object Expand source
stdClass Object
        (
            [id] => 3
            [parent_service_id] =>
            [package_group_id] => 4
            [id_format] => {num}
            [id_value] => 3
            [pricing_id] => 4
            [client_id] => 1
            [module_row_id] => 3
            [coupon_id] =>
            [qty] => 1
            [override_price] =>
            [override_currency] =>
            [status] => active
            [suspension_reason] =>
            [date_added] => 2019-04-24 18:05:00
            [date_renews] => 2019-05-24 18:05:00
            [date_last_renewed] =>
            [date_suspended] =>
            [date_canceled] =>
            [id_code] => 3
            [fields] => Array
                (
                    [0] => stdClass Object
                        (
                            [key] => virtualmin_confirm_password
                            [value] => jkj@awof%d^u
                            [serialized] => 0
                            [encrypted] => 1
                        )

                    [1] => stdClass Object
                        (
                            [key] => virtualmin_domain
                            [value] => blesta.biz
                            [serialized] => 0
                            [encrypted] => 0
                        )

                    [2] => stdClass Object
                        (
                            [key] => virtualmin_password
                            [value] => jkj@awof%d^u
                            [serialized] => 0
                            [encrypted] => 1
                        )

                    [3] => stdClass Object
                        (
                            [key] => virtualmin_username
                            [value] => blestabi
                            [serialized] => 0
                            [encrypted] => 0
                        )

                )

            [package_pricing] => stdClass Object
                (
                    [id] => 4
                    [package_id] => 4
                    [pricing_id] => 5
                    [term] => 1
                    [period] => Month
                    [price] => 5.0000
                    [setup_fee] => 0.0000
                    [cancel_fee] => 0.0000
                    [currency] => USD
                )

            [package] => stdClass Object
                (
                    [id] => 4
                    [id_format] => {num}
                    [id_value] => 4
                    [module_id] => 6
                    [name] => Virtualmin A
                    [description] =>
                    [description_html] =>
                    [qty] =>
                    [module_row] => 3
                    [module_group] =>
                    [taxable] => 0
                    [single_term] => 0
                    [status] => active
                    [company_id] => 1
                    [prorata_day] =>
                    [prorata_cutoff] =>
                )

            [options] => Array
                (
                )

            [name] => blesta.biz
            [virtualmin_confirm_password] => jkj@awof%d^u
            [virtualmin_domain] => blesta.biz
            [virtualmin_password] => jkj@awof%d^u
            [virtualmin_username] => blestabi
        )
Group Membership

If this is the first Package you are creating with this module, select the "Create a New Group" option, and enter a Group name. If you are adding a subsequent Package and wish for it to be part of the same group, select "Select from Available Groups", and move the group from the right to the left of the multi-select box.
When finished, click "Create Package" to create this package.
Final Steps
The only thing left to do is to add this Package Group to an order form so clients may place orders for your Virtualmin servers. See Creating an Order Form for more details.