...
Once installed, a new link will appear under [Packages] > Order Forms, where order forms can be managed. In the screen below, two order forms have already been created and they can be managed at this location.

Creating an Order Form
To create an order form, click the "Add Order Form" button in the upper right of the overview and fill out the options. Click "Add Form" to create the order form.
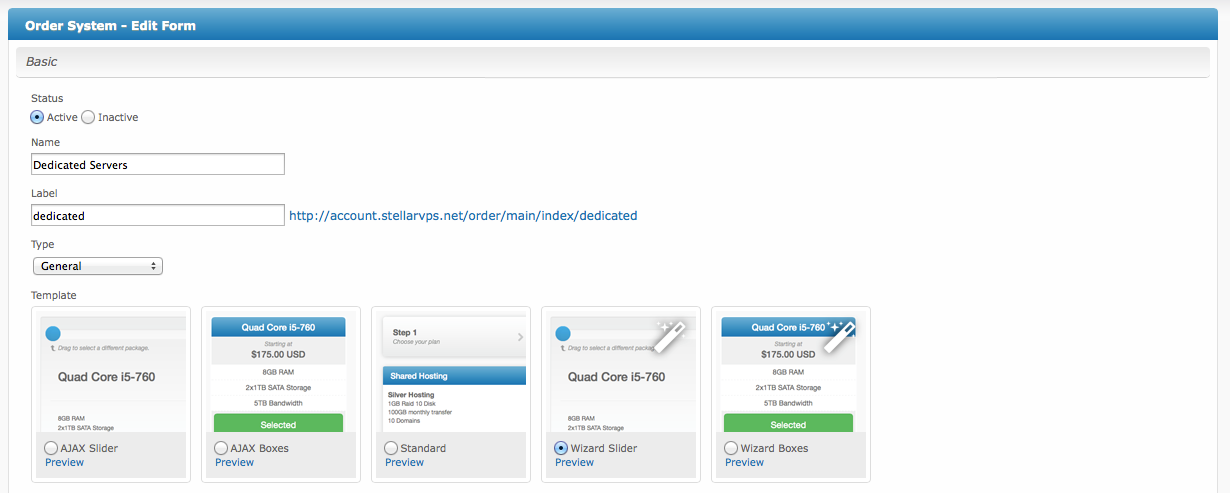
Basic
This section requests some basic information regarding the order form and it's configuration including:
- Status – This is the status of this order form, Active to enable the order form
...
- or Inactive to disable it.
- Name – The name of this order form, this will appear in the heading on front facing pages for this order form.
- Label – The label helps make up the URL to this order form, which is displayed next to the field, and must be unique.
- Type – This is the type of order form, currently the following three are available: Domain and Other, General, and Client Registration. In most cases, the General type is preferred. This selection will determine what options are displayed for the Template.
- Template – Select an order form template. The template controls the look and flow of the order form. Wizard boxes is the default template, and is most widely used.
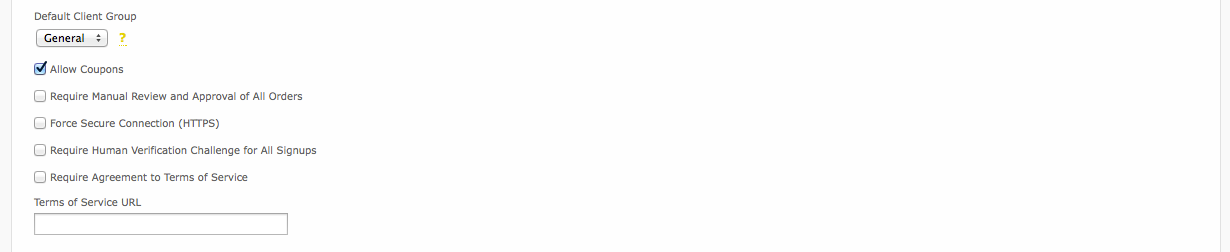
Basic (Continued)
This section contains some additional options within the Basic section.
- Default Client Group – This is the client group users who sign up through this order form will be assigned.
- Allow Coupons – Whether or not coupons should be allowed on this order form. If coupons are not allowed, the coupon section on the order form will not be displayed.
- Require Manual Review and Approval of All Orders – If this is checked, all orders will need to be approved by a staff member before being provisioned, regardless of any anti-fraud settings.
- Force Secure Connection (HTTPS) – If checked, the order form will force https:// URLs.
- Require Human Verification Challenge for All Signups – If checked, reCaptcha or AreYouAHuman human verification will be used, depending on the Setting under the Settings tab.
- Require Agreement to Terms of Service – If checked, users will be required to agree to the terms of service before checking out.
- Terms of Service URL – Enter the URL to your terms of service page. This isn't necessary if "Require Agreement to Terms of Services" isn't checked.
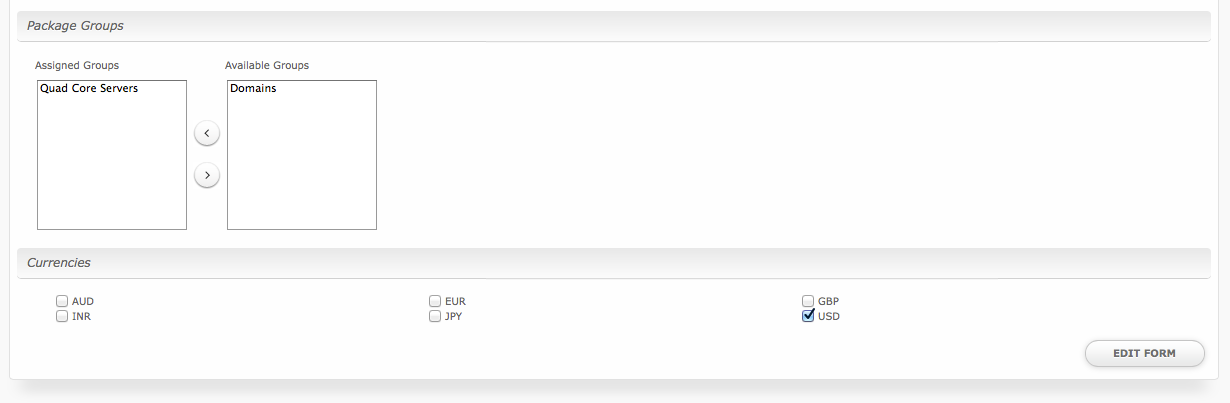
Package Groups & Currencies
These sections determine what Package Groups (And hence Packages) are available through this order form as well as what currencies are accepted.
- Assigned Groups & Available Groups – Move Package Groups from the right box (Available Groups) to the left box (Assigned Groups) to make them available on this order form.
- Currencies – Select which currencies to accept on this order form. If only one currency is selected, the currency selector will not appear on the order form.
...
Settings
The Order System supports various settings for human verification, and fraud detection.
...