| Excerpt | ||
|---|---|---|
| ||
CentOS Web Panel WebPanel or CWP is a free and open source web hosting panel. |
| Table of Contents | ||||||||||
|---|---|---|---|---|---|---|---|---|---|---|
|
...
| title | Documentation |
|---|
About CentOS WebPanel
CentOS WebPanel or CWP is a free and open source web hosting panel. Learn more about CentOS WebPanel on their website at http://centos-webpanel.com/.
Supported Features
| Create | Cancel | Suspend | Unsuspend | Management | Config Options | ||||||||||||||||||||||||||||||||||||
|---|---|---|---|---|---|---|---|---|---|---|---|---|---|---|---|---|---|---|---|---|---|---|---|---|---|---|---|---|---|---|---|---|---|---|---|---|---|---|---|---|---|
|
|
|
|
|
|
Management Features
This module supports the following management features within the client area:
- Unblock IPs in the firewall
| Expand | ||
|---|---|---|
| ||
|

Installing CentOS WebPanel
To install the CentOS WebPanel module, visit [Settings] > [Company] > [Modules] > Available, and click the "Install" button for CentOS WebPanel.

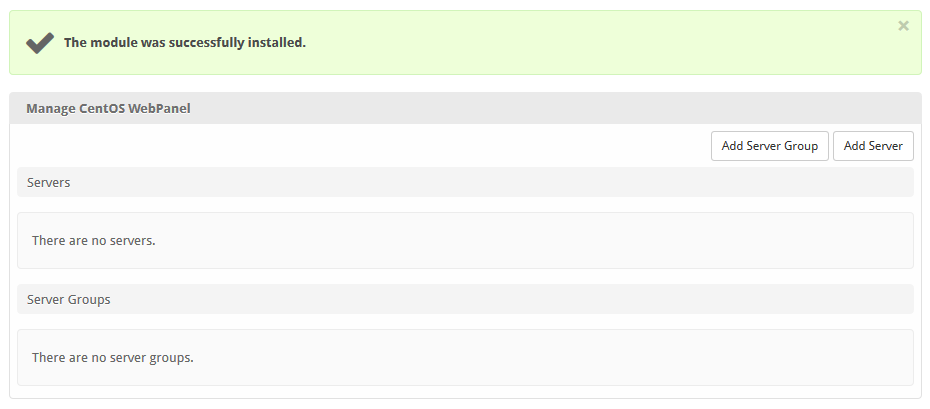
A message will be displayed, indicating that the module was successfully installed. Then click the "Add Server" button.
Enter the details for your CentOS WebPanel server.

| Field Name | Description |
|---|---|
| Server Label | Enter a label for this CentOS WebPanel server, it can be anything you like. |
| Hostname | Enter the FQDN hostname for your CentOS WebPanel server, ie "server1.domain.com". |
| API Key | Enter your CWP server API key, found under CWP Settings > API Manager. Under "Api access management" you can view and add API credentials. |
| Use SSL when connecting to the API | Check this option to use SSL for all API requests to your CentOS WebPanel server. This is highly recommended. |
| Account Limit | Enter the maximum number of accounts that should be added to this CentOS WebPanel server. |
| Name Servers | Enter the name servers that should be used for this server. These will be available to the package welcome email to the client. |
| Notes | Enter any notes that pertain to this server for future reference. |
After filling out these options, click "Add Server" to add your CentOS WebPanel server.
Server Groups
Server groups are useful for categorizing CentOS WebPanel servers. When creating a Package, a specific server, or a server group may be selected for provisioning. Blesta will automatically select a CentOS WebPanel server to provision with when a server group is chosen.
To add a server group, from the CentOS WebPanel overview at [Settings] > [Company] > [Modules] > CentOS WebPanel, click "Add Server Group", then enter the details.
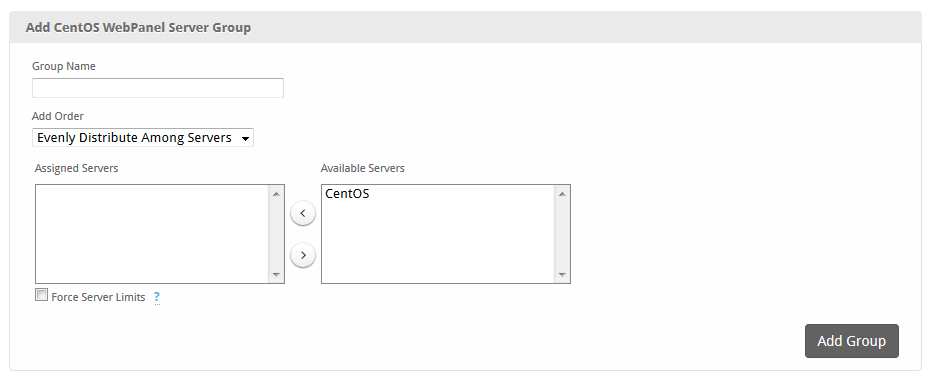
| Option | Details |
|---|---|
| Group Name | Enter the name for this server group. |
| Add Order | Choose how servers in this group will be selected for provisioning. Currently, first non-full server is the only add order. |
| Assigned Servers | Select servers under "Available Servers" and click to move them to the left column to add them to the group. |
| Force Server Limits | Enforces hard limits so that the count of a Server never exceedes its limit. |
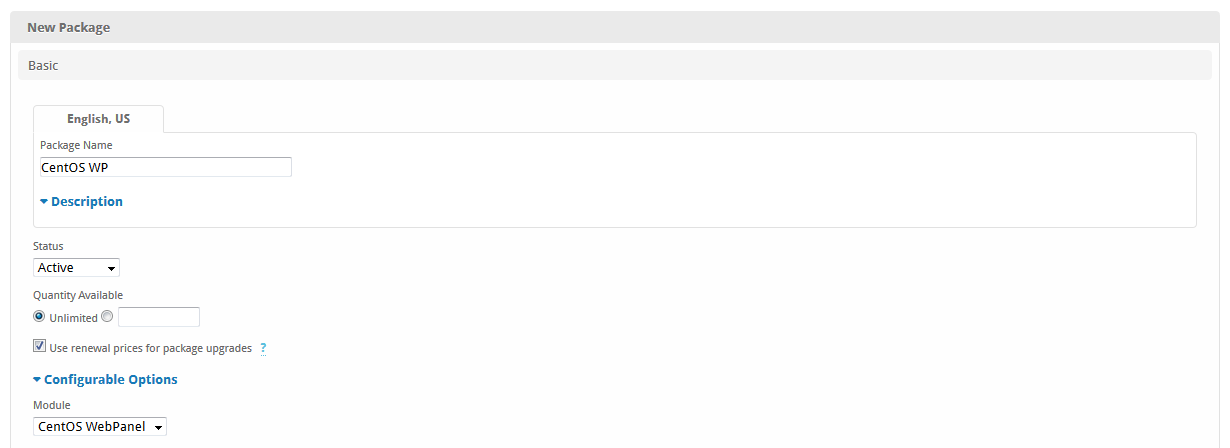
Creating Packages
Packages define the pricing, welcome email, module and more. Packages can be assigned to Package Groups, and added to Order Forms. To create a Package, visit [Packages] > Browse, and click the "Create Package" button.
Creating a Package consists of several sections:
Basic
The Basic section consists of the following options:
| Field Name | Description |
|---|---|
| Package Name | Enter the name of this Package, it will be visible wherever services are listed and on any order forms. A separate name can be defined for each language in the system. |
| Description | Enter a Description for this Package. HTML is allowed, and descriptions appear on order forms. A separate name can be defined for each language in the system. |
| Status | "Active" is the default, "Inactive", and "Restricted" are also available. |
| Quantity Available | If this Package has a limited quantity available, enter the quantity, or leave it as "Unlimited". |
| Use renewal prices for package upgrades | When enabled, upgrading to this package will use renewal prices if they are set. The same will apply to any configurable options that are altered in the upgrade. The regular price will be used if this setting is disabled. |
| Configurable Options | A Configurable Option Group may be selected if previously created, but this module does not support configurable options during provisioning. |
| Module | Select "CentOS WebPanel" for the module. |
Module Options
The Module Options section consists of the following options, which are specific to CentOS WebPanel:
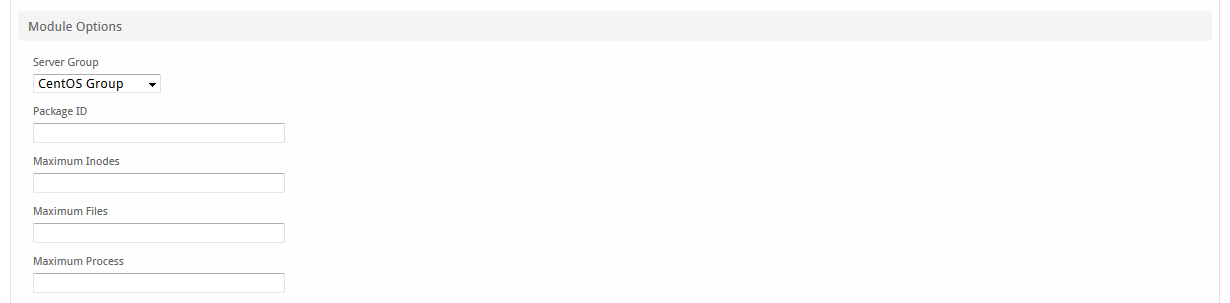
| Field Name | Description |
|---|---|
| Server Group | Select "Any" if you wish to specify a specific server, or select the Server Group to provision from. Selecting a group means that accounts will be provisioned from the group. Selecting a group is recommended. |
| Server | If "Any" is selected above, select the server this package will use to provision accounts. |
| Package ID | The ID of the package to use in CentOS WebPanel |
| Maximum Inodes | The account inodes limit |
| Maximum Files | The maximum number of files that can host the account |
| Maximum Process | The maximum number of process that can run simultaneously |
Pricing
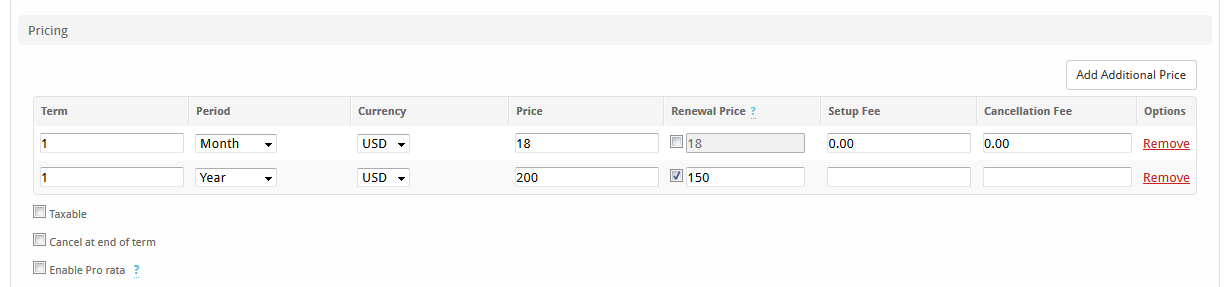
| Field Name | Description |
|---|---|
| Term | Enter the term for the desired pricing option. For example, if you wish to create a 3 month pricing option, enter 3 here. |
| Period | Select the period for this pricing option. "Day", "Week", "Month", "Year", and "One time" are options. The client will be invoiced every "term period", for example every 3 months if 3 is entered for term, and Month is selected for period. |
| Currency | Select the currency this pricing option is available for. |
| Price | Enter the price for this pricing option. |
| Renewal Price | If enabled, the renewal price will be used for service renewals and possibly prorated service changes, depending on the setting above. |
| Setup Fee | If there is a setup fee, enter it here. |
| Cancellation Fee | If there is a fee to cancel early, enter it here. |
Click the "Add Additional Price" to add more pricing options. It's common for people to create 1 Month, 3 Month, 6 Month, and 1 Year price options. There are many possible combinations.
Welcome Email
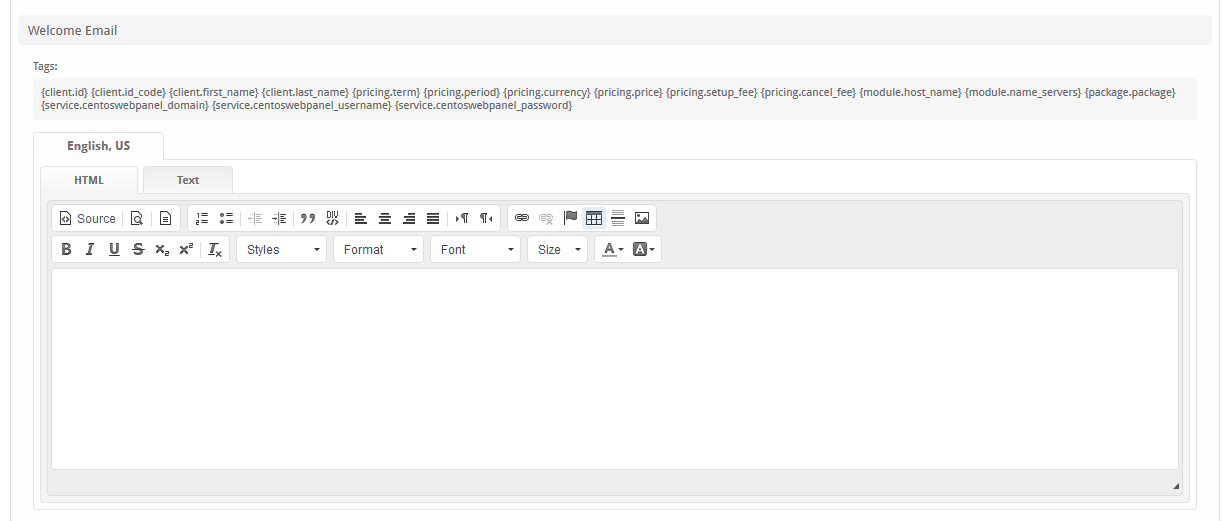
The "Tags" section describes tags that may be used in the welcome email. The welcome email content is inserted into the "Service Creation" email template under [Settings] > [Company] > [Emails] > Service Creation. Only details unique to this service should be entered into the welcome email section for the package.
When creating or editing a package that uses this module, the following tags will be available:
| Tags | Description | Notes |
|---|---|---|
| {module.host_name} | The host name of the server that the service was provisioned on | e.g. "domain.com" |
| {module.name_servers} | An array of available name servers for this module | Array elements must be looped over in the email template. See below for an example. |
| {package.type} | The package meta type | e.g. "standard", "user", "reseller", etc. |
| {package.package} | The package meta package name | e.g. "Bronze" |
| {package.acl} | The package meta access control list | |
| {service.centoswebpanel_domain} | The service field for the domain of the server created by CentOS WebPanel | |
| {service.centoswebpanel_username} | The service field for the CentOS WebPanel account username | |
| {service.centoswebpanel_password} | The service field for the CentOS WebPanel account password |
...