| Excerpt | ||
|---|---|---|
| ||
The universal module Universal Module is the module to use when no other module will do. It allows you to specify what fields to ask for during checkout, and can even interact with a 3rd party API for provisioning of services. This is a powerful replacement to the "none" module in previous versions of Blesta. |
| Table of Contents | ||||||||||
|---|---|---|---|---|---|---|---|---|---|---|
|
About The Universal Module
The Universal Module is the module to use when no other module will do. In some cases you may find that you need a module to request fields from a client for a particular service that will be provisioned manually. Dedicated servers are a perfect example of this. With the Universal Module you can create these fields dynamically, and even have them send a post or email notification when the package or service is created or changes.
Using the Universal Module
Installing the Universal Module
- Visit [Settings] > [Company] > [Modules] > Available.
- Click the "Install" button within the Universal Module module listing.
| Tip |
|---|
When the module is installed, it should automatically load the "Manage" screen for the module. You can get back here any time by visiting [Settings] > [Company] > [Modules] > Installed and by clicking the "Manage" button for the module. |
Products
A Universal Module Product is a collection of package and service request fields, along with a few rules that apply to the product. The product acts as a template for creating packages and services.
Module Options
| Option | Description |
|---|---|
| Name | The name for the product, shown when creating or editing a package. |
Package Options
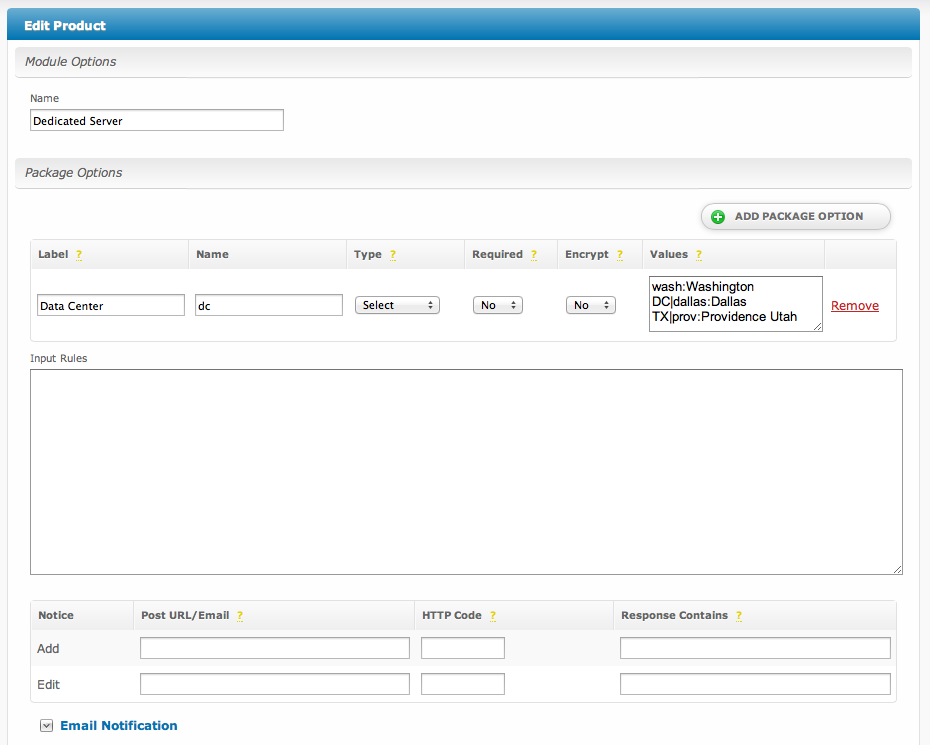
Package options are fields that are requested when a package is added or updated. A product can have any number of package options.
| Option | Description | ||||||||||||||||||
|---|---|---|---|---|---|---|---|---|---|---|---|---|---|---|---|---|---|---|---|
| Label | The display name of the form field. | ||||||||||||||||||
| Name | The name of the input field. This is the name of the value sent in all post and email notifications, and is also used when validating input rules.
| ||||||||||||||||||
| Type | The type of form field.
| ||||||||||||||||||
| Required | If enabled, will require that some value is given for the field. |
...
| Encrypt | If enabled, will store input values encrypted in the database. |
| Values | See Values Format. |
| Input Rules | See Input Rules. |
| Notifications | See Notifications. |
Service Options
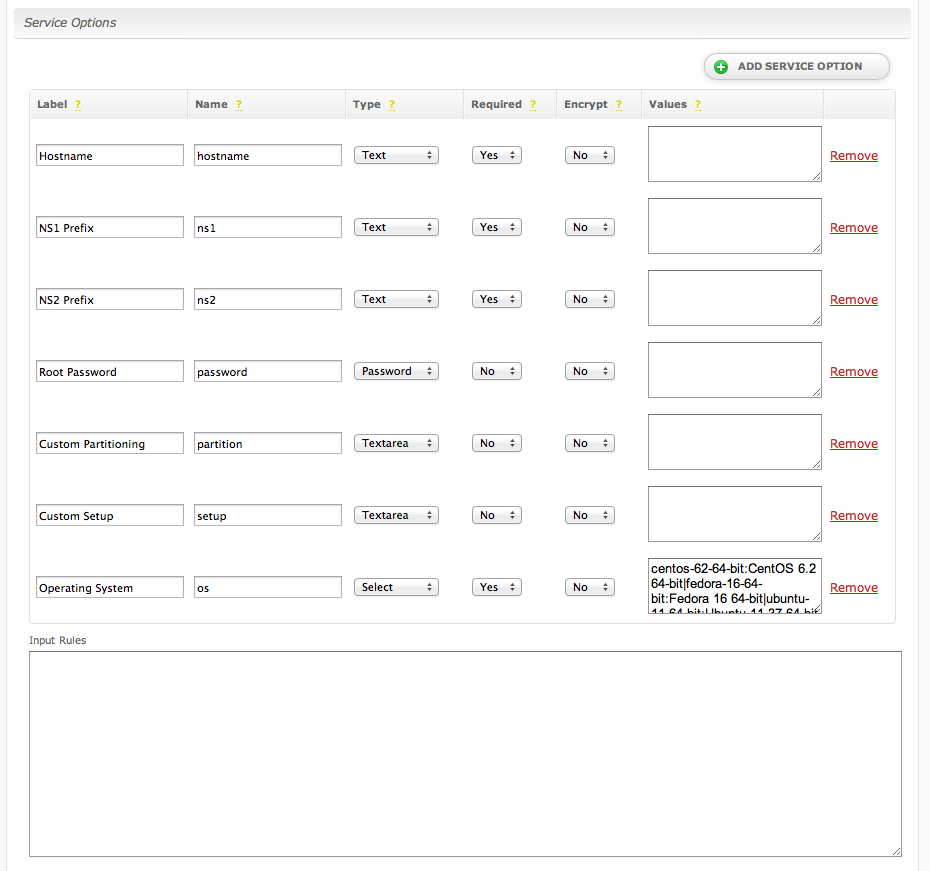
Service options are fields that are requested when a service is added or updated. A product can have any number of service options.
| Option | Description | ||||||||||||||||||
|---|---|---|---|---|---|---|---|---|---|---|---|---|---|---|---|---|---|---|---|
| Label | The display name of the form field. | ||||||||||||||||||
| Name | The name of the input field. This is the name of the value sent in all post and email notifications, and is also used when validating input rules.
| ||||||||||||||||||
| Type | The type of form field.
| ||||||||||||||||||
| Required | If enabled, will require that some value is given for the field. | ||||||||||||||||||
| Encrypt | If enabled, will store input values encrypted in the database. | ||||||||||||||||||
| Values | See Values Format. | ||||||||||||||||||
| Input Rules | See Input Rules. | ||||||||||||||||||
| Notifications | See Notifications. |
Adding a Product
...
Values Format
The values field is a serialized list of field data in the format of name:value, delimited by the | (pipe) character. The name is the value stored for the field and value is the value displayed. For example, if you would like to request a list of check boxes of various flavors of ice cream you might enter: vanilla:Vanilla|chocolate:Chocolate|strawberry:Strawberry|rocky_road:Rocky Road
...
Input rules are a JSON encoded associative array object of input validation rules. They allow you to specify how each field should be validated against errors on input. For additional details on input rules see Error Checking. Let's take a look at an example:
| Code Block | ||
|---|---|---|
| ||
{"service_field_1
	"hostname":{
		"valid":{
			"rule":"isEmpty",
			"negate":true,
			"message":"Service Field 1Hostname must not be empty."
		}
	},
	"password":{
		"valid":{
			"rule":["matches", "/^[a-z0-9\\$\\%\\^]{10,20}$/i"],
			"message":"Please enter a password using alphanumeric characters between 10 and 20 characters in length. You may also include special characters like '$%^'."
		}
	}
} |
In the above example we're validating the service_field_1 the hostname field using the isEmpty rule and negating it using the negate attribute. This ensures that the hostname field is not empty when submitted. If the rule validation fails (hostname is empty) the message we defined using the message attribute will be displayed to the user. We are also validating the password field at the same time using the matches rule, which evaluates a given regular expression. This rule requires that the password contain between 10 and 20 characters, inclusive, all of which must be characters of any combination from A through Z, upper or lower case, the digits 0 through 9, and the special characters $, %, and ^.
Note that the service_field_1 field is not empty when submitted. If it is empty a Service Field 1 must not be empty error will be displayed.special character literals like $, %, and ^ should be escaped where appropriate in the regular expression via double backslashes. Additionally, so should special characters in JSON format, like quotes (") and back slashes (\)themselves. Creating invalid JSON will cause all fields to pass validation because the JSON cannot be parsed to retrieve the rules. Creating invalid regular expressions will cause unexpected behavior.
Notifications
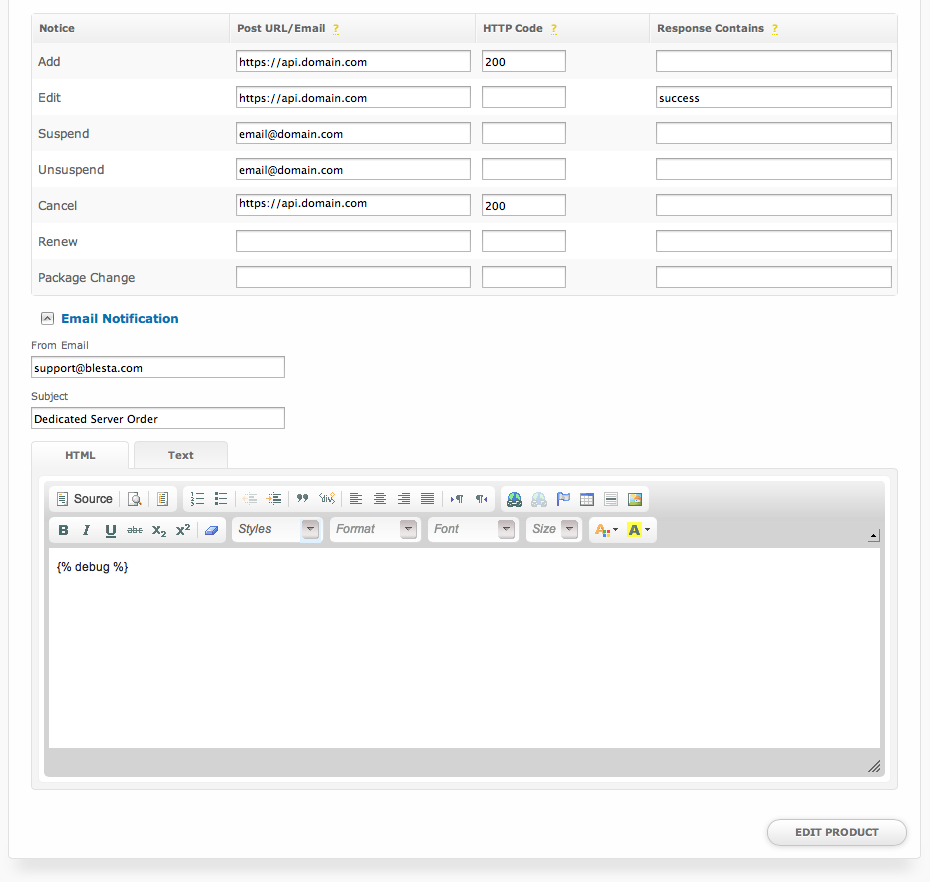
Notifications allow the universal module to post to a given URL or email a given address when a certain action occurs.
Package Option Notifications
Package option notifications are executed when an action is performed on the package.
| Option | Description | ||||||
|---|---|---|---|---|---|---|---|
| Notice | The action triggers the notification.
| ||||||
| Post URL/Email | The URL to post to, or the email address to email, when the notice is triggered | ||||||
| HTTP Code | The HTTP Response Code returned by the URL that signifies a successful transmission. | ||||||
| Response Contains | Some portion of the output returned by the URL that signifies a successful transmission. This can be used separately, or in conjunction with the HTTP Code for more refined control over successful responses. | ||||||
| From Email | The address to send email notifications from. | ||||||
| Subject | The subject of the email notification. | ||||||
| HTML/Text | The HTML and Text body content for the email notification. |
Package Option Notification Tags
The package option notification emails allow for the following tags:
| Tags | Description | Notes | Version |
|---|---|---|---|
{*} | The value submitted for this custom field | {*} is NOT an actual tag. Every custom package field has a tag associated with it, this tag is labeled by the fields name represented here by * (e.g. {my_field}) | |
| {*_name} | The label associated with the submitted value for fields of type select or radio | This tag is only available for radio and select fields (e.g. {my_field_name}) | 4.1 |
| {*_values} | A list of checked boxes for this field each containing the box's label and value | This tag is only available for checkbox fields (e.g. {my_field_values}) | 4.1 |
| {_action} | The code of the action for which this notification is being sent | 4.1 | |
| {_package.id} | The system-level service ID | The _package tag is not available for the package addition notification | 4.1 |
| {_package.description} | The package's description | 4.1 | |
| {_package.module_row} | The ID of the module row the package is associated with | 4.1 | |
| {_package.status} | The status of the package | 4.1 |
| Info | ||
|---|---|---|
| ||
The {*_values} tag contains data in the following format. For a guide on using email tags in Blesta see the Customizing Emails page. custom_1_values = array( array( 'value' => '1', 'name' => 'Option 1' ), array( 'value' => '2', 'name' => 'Option 2' )); |
| Expand | |||||||
|---|---|---|---|---|---|---|---|
| |||||||
Due to the nature of tag objects containing several fields, many of which are likely irrelevant for use in email templates, but may be useful to you in certain circumstances, a dump of the tags are shown below.
|
Service Option Notifications
Service option notifications are executed when an action is performed on the service.
| Option | Description | ||||||||||||||||
|---|---|---|---|---|---|---|---|---|---|---|---|---|---|---|---|---|---|
| Notice | The action triggers the notification.
| ||||||||||||||||
| Post URL/Email | The URL to post to, or the email address to email, when the notice is triggered | ||||||||||||||||
| HTTP Code | The HTTP Response Code returned by the URL that signifies a successful transmission. | ||||||||||||||||
| Response Contains | Some portion of the output returned by the URL that signifies a successful transmission. This can be used separately, or in conjunction with the HTTP Code for more refined control over successful responses. | ||||||||||||||||
| From Email | The address to send email notifications from. | ||||||||||||||||
| Subject | The subject of the email notification. | ||||||||||||||||
| HTML/Text | The HTML and Text body content for the email notification. |
Service Option Notification Tags
The service option notification emails allow for the following tags:
| Tags | Description | Notes | Version |
|---|---|---|---|
{*} | The value submitted for this custom field | {*} is NOT an actual tag. It is only a placeholder in this documentation. Every custom service field has a tag associated with it, this tag is labeled by the fields name represented here by * (e.g. {my_field}) | |
| {*_name} | The label associated with the submitted value for fields of type select or radio | This tag is only available for radio and select fields (e.g. {my_field_name}) | 4.1 |
| {*_values} | A list of checked boxes for this field each containing the box's label and value | This tag is only available for checkbox fields (e.g. {my_field_values}) | 4.1 |
| {_action} | The code of the action for which this notification is being sent | 4.1 | |
| {_service.id} | The system-level service ID | The _service tag is not available for the service addition notification | 4.1 |
| {_service.status} | The service status | 4.1 | |
| {_service.date_added} | The UTC datetime stamp of the date the service was added | Formatted as "YYYY-MM-DD HH:MM:SS" | 4.1 |
| {_service.date_renews} | The UTC datetime stamp of the service renew date | Formatted as "YYYY-MM-DD HH:MM:SS" | 4.1 |
| {_service.date_last_renewed} | The UTC datetime stamp of the service's last renew date | Formatted as "YYYY-MM-DD HH:MM:SS" | 4.1 |
| {_service.date_suspended} | The UTC datetime stamp of the date the service was suspended | Formatted as "YYYY-MM-DD HH:MM:SS" | 4.1 |
| {_service.date_canceled} | The UTC datetime stamp of the date the service was canceled | Formatted as "YYYY-MM-DD HH:MM:SS" | 4.1 |
| {_package.id} | The system-level service ID | 4.1 | |
| {_package.description} | The package's description | 4.1 | |
| {_package.module_row} | The ID of the module row the package is associated with | 4.1 | |
| {_package.status} | The status of the package | 4.1 | |
| {_other.*} | The _other tag contains additional information, most of which is received through user input | Here * is the name of the field to access from the other tag (e.g. pricing_id) |
| Info | ||
|---|---|---|
| ||
The {*_values} tag contains data in the following format. For a guide on using email tags in Blesta see the Customizing Emails page. custom_1_values = array( array( 'value' => '1', 'name' => 'Option 1' ), array( 'value' => '2', 'name' => 'Option 2' )); |
| Expand | ||||||||||||||
|---|---|---|---|---|---|---|---|---|---|---|---|---|---|---|
| ||||||||||||||
Due to the nature of tag objects containing several fields, many of which are likely irrelevant for use in email templates, but may be useful to you in certain circumstances, a dump of the tags are shown below.
|
Client Service Info
Client Service Info renders the information shown in the expandable area and on the Information tab when clicking to manage the service within the client area when clicking on the service row.
Example Code (Replace tags with appropriate service or package tags. In this example, we have service fields called vpnuser, vpnpass, vpnhost)
| Code Block | ||
|---|---|---|
| ||
	<div class="table-responsive">
	<table class="table table-curved table-striped">
		<thead><tr>
			<th>VPN USer</th>
			<th>VPN Pass</th>
			<th>VPN Host</th>
		</tr>
		</thead>
		<tbody>
		<tr>
			<td>{service.fields.vpnuser}</td>
			<td>{service.fields.vpnpass}</td>
			<td>Login at <a href="https://{service.fields.vpnhost}">{service.fields.vpnhost}</a></td>
		</tr>
		</tbody>
	</table>
</div> |
Admin Service Info
Admin Service Info renders the information shown in the expandable area within the client profile when clicking on the service row in the admin area.
Example Code (Replace tags with appropriate service or package tags. In this example, we have service fields called vpnuser, vpnpass, vpnhost)
| Code Block | ||
|---|---|---|
| ||
	<table class="table">
		<tbody><tr class="heading_row">
			<td class="border_left">VPN USer</td>
			<td>VPN Pass</td>
			<td>VPN Host</td>
		</tr>
		<tr>
			<td>{service.fields.vpnuser}</td>
			<td>{service.fields.vpnpass}</td>
			<td>Login at <a href="https://{service.fields.vpnhost}">{service.fields.vpnhost}</a></td>
		</tr>
		</tbody>
	</table>
|
Creating Packages
| Info | ||
|---|---|---|
| ||
Universal Module product service field names are used for the email tag. For example, a service field with the name "hostname" would result in a tag available to the welcome email of {service.hostname}. Universal module products are unique in this regard because each product may have different tags, defined by the staff member who created them. |
Tools
Here's a sample PHP script you can use as a test endpoint to see the data that is received via POST when defining a Post URL instead of an email for any of the Package or Service Notices.
Create a file called post.php and test.txt that is writable by the web server, upload those files to a location such as yourdomain.com/post.php and use this URL as your Post URL in your Universal Module Product configuration.
| Code Block | ||
|---|---|---|
| ||
<?php
// Check if the request method is POST
if ($_SERVER['REQUEST_METHOD'] === 'POST') {
    // Get the POST data
    $postData = file_get_contents('php://input');

    // Parse the URL-encoded data into an associative array
    parse_str($postData, $dataArray);

    // Specify the file name
    $fileName = 'test.txt';

    // Convert the array to a readable string format
    $formattedData = print_r($dataArray, true);

    // Attempt to write the formatted data to the file
    if (file_put_contents($fileName, $formattedData) !== false) {
        // Send a success response
        http_response_code(200);
        echo "Data successfully written to $fileName.";
    } else {
        // Send an error response if unable to write
        http_response_code(500);
        echo "Failed to write data to $fileName.";
    }
} else {
    // Send a method not allowed response if the request is not POST
    http_response_code(405);
    echo "Method not allowed. Please use a POST request.";
}
?>
|
Set the URL for the notice to the location of post.php and perform the action. Then check the test.txt file for the results. You should see something like this in the file:
| Expand | ||
|---|---|---|
| ||
Array [1] => Array ) [pricing] => Array ) [groups] => Array [1] => Array ) [name] => Test ) [names] => Array [1] => Array ) [descriptions] => Array [1] => Array ) [description] => [_action] => service_notice_add [date_added] => 2024-08-02 19:13:13 ) |


