...
Mail settings allow the choice of PHP or SMTP mail methods, and whether or not to send HTML email. HTML email content can be specified alongside text content in Email Templates. The ability to specify an SMTP server in multi-company installations is especially useful because email for those companies may originate from different domains. With SPF and DKIM becoming more popular, using the appropriate mail server is important for deliverability.
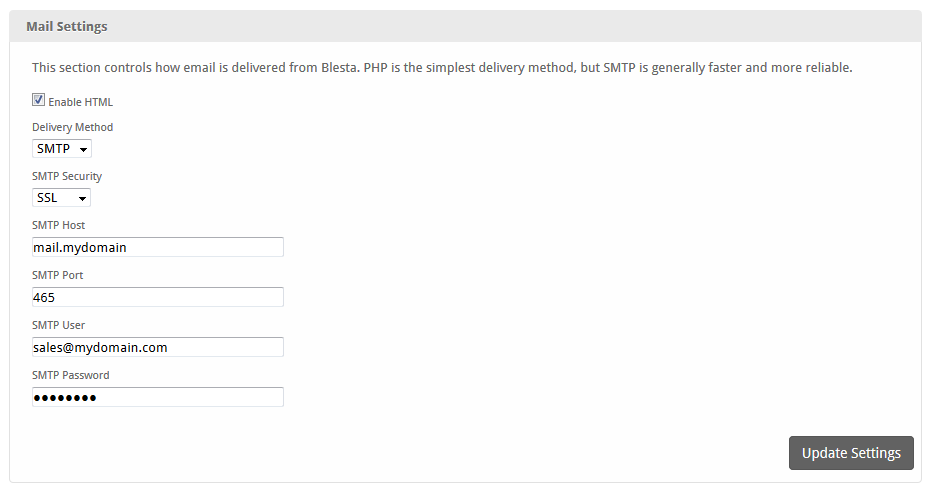
| Option | Description | ||
|---|---|---|---|
| Enable HTML | Check to enable sending HTML emails. A text version of the email will also be sent, to ensure users with HTML content disabled can still read the message. | ||
| Delivery Method | SMTP uses an SMTP server for mail delivery. PHP will attempt to send email through PHP. SMTP is generally faster, more secure, and more reliable, so that is the recommended option. | ||
| Test These Settings | Click this button to validate the entered SMTP credentials. | ||
| SMTP Host | Set the host name | SMTP Security | Sets the security protocol used to communicate with the SMTP server. |
| SMTP Port | Sets the port used to communicate with the SMTP server. | ||
| SMTP User | The SMTP user to send mail through. | ||
| SMTP Password | The password for the SMTP user. | ||
| Test From Address | The from address to use when testing the settings. | ||
| Test To Address | This is only for testing the send mail command and will be used to send a test email to the specified email address (or a random disposable one). |
Email Templates
All available email templates for the authenticated company are available here and are available for edit. Each template is available for edit in all installed languages, in both HTML and Text. Email templates support Conditional Statements, Loops, and Filters. Details and syntax for these are described under Customizing Emails.
...
If using Gmail, or Google as your SMTP provider, please select TLS for security and use port 587.
In order to send from a different address, you must create an alias and allow your email address to do so.
- First create the Alias, you can do that by following the steps at this link: https://support.google.com/a/answer/33327?hl=en
- Once you've created the Alias go to Settings > Accounts, where it says "Send mail as:" click "Add another email address."
- A new window will appear, enter your name and the alias you created and check the box that says "Treat as an alias."
Note: If you have configured various email addresses in your Email Templates. You have to create each alias in Gmail and allow it.