| Excerpt | ||
|---|---|---|
| ||
Installation steps and common issues. |
| Table of Contents | ||||||||||
|---|---|---|---|---|---|---|---|---|---|---|
|
| Tip | ||
|---|---|---|
| ||
Does your server have Softaculous installed? If so, you may alternatively install Blesta through Softaculous. |
| Tip | ||
|---|---|---|
| ||
Does your server have Installatron installed? If so, you may alternatively install Blesta through Installatron. |
Installation
Watch the video or follow these steps to install Blesta on your server.
| HTML |
|---|
<iframe src="https://player.vimeo.com/video/287730808" width="640" height="400" frameborder="0" webkitallowfullscreen mozallowfullscreen allowfullscreen></iframe> |
1. Download Blesta
Visit https://account.blesta.com/client/plugin/download_manager/client_main/ and click to download the latest version.
2. Unzip the Archive
Unzip the Blesta archive (.zip) file using your favorite compression utility. On Windows, right click and select "Extract All". If the zip is uploaded to or downloaded directly to a Linux server, run the following in your shell:
| Code Block | ||
|---|---|---|
| ||
unzip blesta-vx.x.x.zip |
3. Apply Hotfix Files (if necessary)
The Blesta files are available in the /blesta/ directory. These are the files you should use by default. However, it may be necessary to overwrite some of them with a set from a hotfix directory.
The files from a hotfix directory need to be applied if you are running an older version of the ionCube loader, or an older version of PHP. The following criteria will help you to determine what hotfix directory to use to overwrite your Blesta files with prior to installation.
| Note |
|---|
A message will be displayed during installation indicating what hotfix should be applied if one is necessary. |
A hotfix is necessary if your ionCube loader is older than v10.1.0:
- ionCube version >= 10.1.0 - no hotfix needs to be applied. Skip to step 4.
- ionCube version < 10.1.0 - a hotfix needs to be applied
If a hotfix needs to be applied, the correct hotfix to use depends on your version of PHP:
- PHP version >= 7.1.0 - use /hotfix-php71/blesta/
- PHP version >= 5.6.0 and < 7.1.0 - use /hotfix-php7/blesta/
- PHP version >= 5.4.0 and < 5.6.0 - use /hotfix-php54/blesta/
Apply the hotfix by overwriting the contents of the /blesta/ directory with the contents of the hotfix directory (e.g. /hotfix-php71/blesta/).
4. Upload Files & Launch Installer
Upload the contents of the /blesta/ directory to your server where you will be accessing Blesta. Before you continue any further, ensure you've created a database that Blesta can be installed into. You'll need your database host (usually localhost), database name, database user, and database user password to continue with installation.
Blesta may be installed in one of two ways, either via the web in your browser, of via command line.
Web Installation
Follow these steps to install Blesta via the web.
- Point your web browser to the location where you uploaded the contents of blesta (e.g. https://yourdomain.com/path_to_blesta/).
- Follow the on screen instructions to complete installation.
- Once installation completes, you'll be prompted to create your administrator user and enter your license key or start a free trial.
The following is an example PHP script to perform automatic (not interactive) installation via the web URL:
| Code Block | ||||
|---|---|---|---|---|
| ||||
<?php
#
# This makes a POST request to the Blesta installer
#

$post = [
    'agree' => 'yes',
    'host' => 'localhost',
    'port' => '3306',
    'database' => 'blesta',
    'user' => 'user',
    'password' => 'password',
];

$ch = curl_init();

curl_setopt($ch, CURLOPT_URL, 'myblestadomain.com/install/process');
curl_setopt($ch, CURLOPT_POST, true);
curl_setopt($ch, CURLOPT_POSTFIELDS, http_build_query($post));
curl_setopt($ch, CURLOPT_RETURNTRANSFER, true);

$response = curl_exec($ch);
$errors = curl_error($ch);
curl_close($ch);

echo "RESPONSE: ";
print_r($response);

echo "ERRORS: ";
var_dump($errors);
|
NOTE! If the web server is not Apache, or is missing mod_rewrite, the curl URL must be pre-pended with index.php, e.g. myblestadomain.com/index.php/install/process
Command Line Installation
Follow these steps to install Blesta via the command line.
- In a shell, cd to the directory you uploaded the contents of blesta.
- The CLI installer can be run in interactive mode, or non-interactive mode by passing parameters.
For interactive mode run
Code Block php ./index.php install
Info title Root Web Directory Setting If Blesta is not installed in the document root on your web server, it is important to note that the "Root Web Directory" setting will be inaccurate unless you install Blesta while your current working directory is set to the document root:
Code Block title Installing from the web server's document root cd /to/your/web/server/document/root/ php ./path/to/blesta/index.php install
For automatic mode run
Code Block php ./index.php install -dbhost DATABASE_HOST -dbname DATABASE_NAME -dbuser DATABASE_USER -dbpass DATABASE_PASS -hostname WEBSITE_HOSTNAME -docroot DOCUMENT_ROOT_PATH
Parameter Description -dbhost The database hostname (usually localhost) -dbname The database name -dbuser The database user -dbpass The database password -hostname The website hostname. For example, billing.domain.com. The is the hostname where Blesta will be accessed from. If not set, will attempt to detect the hostname from server configuration, which in many cases will not be accurate. -docroot The full absolute path to the web server's document root (e.g. /var/www/html/). This should not be set to Blesta's installed directory unless Blesta is installed in document root. If this value is not set, it will be set based on your current working directory, which will not be accurate unless the current working directory is the document root.
Info title Option added in v4.6.0 This value can be changed from within Blesta, after installation, under Settings > System > General > "Root Web Directory".
- Once installation completes, direct your web browser to https://yourdomain.com/path_to_blesta/admin/ to create your administrator user and enter your license key or start a free trial.
Once completed, you'll be logged in for the first time automatically. For subsequent logins, see Logging In. You may also want to enable Two-Factor Authentication.
| Info | ||
|---|---|---|
| ||
If you do not have a license key, you will be able to activate a free trial during the installation process directly. If you have previously purchased a license key, you will be able to enter it during the installation process. You may obtain a license directly from us at www.blesta.com, from one of our resellers, or directly from your hosting provider. Version 2 license keys are not compatible with version 3, so if you only have a version 2 license key you will need to request a version 3 key for each version 2 license you hold. |
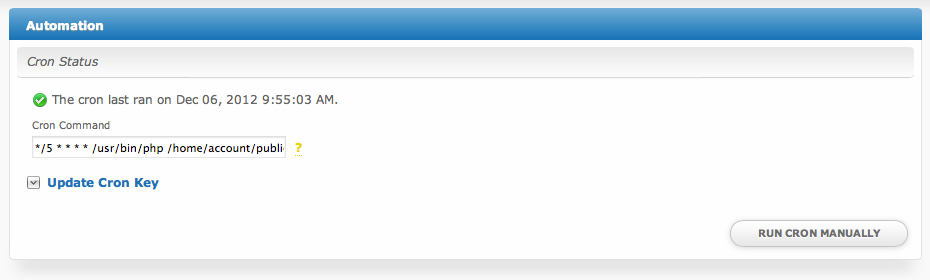
5. Set up a Cron Job
Once installation is complete, a cron job must be created to automate tasks within Blesta. Go to [Settings] > [System] > Automation, and copy the "Cron Command", for use in creating a cron job on your server. Most hosting control panels provide an easy way to create cron jobs, follow the documentation for your control panel to complete this important step. The cron job should run every 5 minutes. Once the cron has been configured, verify that the status icon turns green and displays the last time run on the System Automation page within Blesta.
| Note |
|---|
If using a control panel to configure the cron, you may not need to copy the first part of the cron command "*/5 * * * *" which designates that the cron run every 5 minutes. Your control panel may ask for schedule information separately. Please also note that your path to PHP may be different, as it can vary from server to server. On some cPanel servers, the path is /usr/local/bin/php |
| Info | ||
|---|---|---|
| ||
The cron outputs information about the tasks it is running, and your cron daemon may email your cron user the output of your Blesta crons. To disable that, you can append the following to the end of your cron command: " >/dev/null 2>&1" (remove quotes) |
| Info | ||
|---|---|---|
| ||
Using CLI is always recommended, but the cron may be run by accessing https://www.yourdomain.com/blesta/install/path/cron/?cron_key=CRONKEY where CRONKEY is your cron key as displayed under "Update Cron Key" wget method If you do not have mod_rewrite, the URL will need to include index.php, for example: https://www.yourdomain.com/blesta/install/path/index.php/cron/?cron_key=CRONKEY where CRONKEY is your cron key as displayed under "Updated Cron Key". |
System Configuration
There are a number of configuration settings that may be set before or after installation.
Requiring index.php in URLs
By default Blesta does not include index.php as part of any URL request, thanks to the use of .htaccess mod_rewrite rules. If your server does not support mod_rewrite Blesta requires index.php to be included in all URLs. To force Blesta to include index.php in all URLs simply rename or delete the .htaccess file included with Blesta in your root web directory.
| Info | ||
|---|---|---|
| ||
If so, you may be able to enable pretty URLs by creating the appropriate web server config, and modifying the /lib/init.php file to set define("HTACCESS", true); |
Changing the path to the Admin area
By default the path to the Admin area begins with /admin/. To change this locate routes.php in /installpath/config/routes.php and modify the value of the "Route.admin" configuration. For example, to change the path of the admin area to /staff/ set the following:
| Code Block | ||||
|---|---|---|---|---|
| ||||
Configure::set("Route.admin", "staff"); |
Changing the path to the Client area
By default the path to the Client area begins with /client/. To change this locate routes.php in /installpath/config/routes.php and modify the value of the "Route.client" configuration. For example, to change the path of the client area to /customers/ set the following:
| Code Block | ||||
|---|---|---|---|---|
| ||||
Configure::set("Route.client", "customers"); |
Forcing HTTPS
If your server supports mod_rewrite, you can enable HTTPS redirects by uncommenting the following lines (remove the '#' symbols) from the .htaccess file included with Blesta.
| Code Block | ||
|---|---|---|
| ||
#RewriteCond %{HTTPS} !=on
#RewriteRule ^ https://%{HTTP_HOST}%{REQUEST_URI} [R=307,NE,L] |
Common Installation Issues
Errors
- During installation, you receive a blank page that reads "The file /blesta/app/models/license.php is corrupted." or "The file /blesta/app/app_controller.php is corrupted."
- You must apply the correct hotfix files to your installation.
- During installation, you receive a blank white page (or a 500 Internal Server Error).
- You may not have the ionCube loader installed correctly, or you may not have applied the correct hotfix files over your Blesta installation.
- Connection FAILED. Ensure that you have created the database and that the credentials are correct.
- Check to ensure the hostname, database name, user, and password you entered are correct and try again.
If the credentials are correct you may have MySQL old_passwords enabled. Disable old_passwords for your database or update your user's password:
Code Block language bash % mysql % SET SESSION old_passwords=0; % SET PASSWORD FOR 'username'@'localhost' = PASSWORD('password');
- Call to undefined function crypt_random() on line 1660 in /home/user/blesta/vendors/phpseclib/Crypt/RSA.php
- The line number and path may be different. This error has most commonly been seen with Nginx installations. The issue has to do with a missing include_path in php.ini.
- Edit your php.ini to add the include_path to your PHP binary.
- Please see this forum thread for more details on this issue, and to download a test script to confirm whether your server is affected by this issue.
- The email failed to send due to a configuration issue. Occurs when trying to send an email, and email is configured correctly.
- Disable SELinux (Via SSH run as root "echo 0 > /selinux/enforce" Then, so that it remains off after boot, edit /etc/sysconfig/selinux and set SELINUX=disabled
- If you MUST run SELinux (not recommended) you can run the following command instead "setsebool -P httpd_can_sendmail 1"
- Mod rewrite is not enabled, or htaccess is not supported by this server.
- Make sure mod_rewrite is loaded in Apache and that AllowOverrides is set to All in your httpd.conf for your virtualhost
- Make sure MultiViews is disabled in your virtualhost in httpd.conf. (If you receive this error and the URL in your browser is ~/install/ this is almost certainly the issue)
- Cron does not work, outputs error "Undefined variable: argv on line"...
- Edit your php.ini file and set register_argc_argv to "on". Restart the web server.
- If running CloudLinux, you may need to edit the php.ini for alt-php. The location of the php.ini will be something like: /opt/alt/php54/etc/php.ini (Note the version php54, php55, etc) Then, run the following command to rebuild: cagefsctl --rebuild-alt-php-ini
- I get a white page at /settings/company/billing/invoices/ after upgrading to version 4
- Remove ~/helpers/html. This directory was removed in v4 and may be causing the issue. You might also see the error "Cannot declare class Html, because the name is already in use in ..."
- I get an "Undefined index: total" or "Error while sending QUERY packet" or "PDOStatement::execute(): send of 113 bytes failed with errorno=32 Broken pipe"
- It's possible max_allowed_packets and/or wait_timeout values are too low in your MySQL config. Edit /etc/my.cnf (default location) and set max_allowed_packets to a value of 128M or higher, and wait_timeout to a value of 3600 or higher.
- After I install, when I try to login it automatically logs me out. I may see a flash of the Dashboard before I'm redirected.
- Make sure the PHP extension Suhosin is disabled.
- I get an error about open_basedir restriction: realpath(): open_basedir restriction in effect
- We recommend disabling open_basedir. For Plesk, see https://support.plesk.com/hc/en-us/articles/213919825-How-to-change-PHP-parameter-for-all-domains- and set open_basedir to "none". For cPanel see https://documentation.cpanel.net/display/76Docs/PHP+open_basedir+Tweak
- The alternative is to add additional paths to open_basedir to satisfy Blesta, including /dev/urandom, /tmp, and your users home directory (i.e. /home/username/)
IIS
- Submitting data reloads the current page
There is an issue with your web.config file. Try the following web.config file:
Code Block <?xml version="1.0"?> <configuration> <system.webServer> <rewrite> <rules> <rule name="Main Rule" stopProcessing="true"> <match url=".*" /> <conditions logicalGrouping="MatchAll"> <add input="{REQUEST_FILENAME}" matchType="IsFile" negate="true" /> <add input="{REQUEST_FILENAME}" matchType="IsDirectory" negate="true" /> </conditions> <action type="Rewrite" url="index.php" /> </rule> </rules> </rewrite> </system.webServer> </configuration>Next, update /core/ServiceProviders/MinphpBridge.php and make the following change:
Code Block // $htaccess = file_exists($rootWebDir . '.htaccess'); $htaccess = true;
Nginx
- For pretty URL's (without /index.php/ in every URI) you will need to add a custom Nginx configuration. For a community provided example configuration, please see https://www.blesta.com/forums/index.php?/topic/9320-nginx-config/ or use the following (recommended) configuration
Code Block # Redirect HTTP to HTTPS server { listen 0.0.0.0:80 default_server ssl http2; # IPv4 listen [::]:80 default_server ssl http2; # IPv6 server_name account.yourdomain.com; # Hostname return 301 https://$host$request_uri; } # Run Blesta on SSL server { listen 0.0.0.0:443 default_server ssl http2; # IPv4 listen [::]:443 default_server ssl http2; # IPv6 server_name account.yourdomain.com; # Hostname root /var/www/account.yourdomain.com; # Installation directory # SSL cert/key pair ssl_certificate /etc/ssl/certs/account.yourdomain.com.crt; ssl_certificate_key /etc/ssl/private/account.yourdomain.com.key; # iFrame protection add_header X-Frame-Options SAMEORIGIN; location / { try_files $uri /index.php; rewrite ^(.*)/install\.php$ /$1/install/ redirect; } location = /index.php { fastcgi_pass unix:/run/php/php7.3-fpm.sock; # PHP socket fastcgi_param SCRIPT_FILENAME $document_root/index.php; # Blesta /index.php fastcgi_param SCRIPT_NAME $fastcgi_script_name; include fastcgi_params; } location ~ /\. { log_not_found off; return 404; } location ~* \.(php|pdt|txt)$ { log_not_found off; return 404; } }Expand title Here's an additional configuration for systems with TLS 1.3 support (Running OpenSSL 1.1.1+) Code Block server { listen 80 default_server; listen [::]:80 default_server; server_name _; access_log /path/to/.logs/access.log main; error_log /path/to/.logs/errors.log warn; root /path/to/site/public; index index.php index.html; location / { try_files $uri $uri/ /index.php?q=$uri&$args; } error_page 500 502 503 504 /50x.html; location = /50x.html { root /var/lib/nginx/html; } location ~ \.php$ { try_files $uri =404; fastcgi_split_path_info ^(.+\.php)(/.+)$; fastcgi_pass 127.0.0.1:9000; fastcgi_param SCRIPT_FILENAME $document_root$fastcgi_script_name; fastcgi_param SCRIPT_NAME $fastcgi_script_name; fastcgi_index index.php; include fastcgi_params; } location ~* \.(jpg|jpeg|gif|png|css|js|ico|xml)$ { expires 5d; } if ($scheme != https) { return 307 https://domain.tld$request_uri; } } server { listen 443 ssl; listen [::]:443 ssl; server_name _; access_log /path/to/.logs/access.log main; error_log /path/to/.logs/errors.log warn; root /path/to/site/public; index index.php index.html; location / { try_files $uri $uri/ /index.php?q=$uri&$args; } error_page 500 502 503 504 /50x.html; location = /50x.html { root /var/lib/nginx/html; } location ~ \.php$ { try_files $uri =404; fastcgi_split_path_info ^(.+\.php)(/.+)$; fastcgi_pass 127.0.0.1:9000; fastcgi_param SCRIPT_FILENAME $document_root$fastcgi_script_name; fastcgi_param SCRIPT_NAME $fastcgi_script_name; fastcgi_index index.php; include fastcgi_params; } location ~* \.(jpg|jpeg|gif|png|css|js|ico|xml)$ { expires 5d; } ssl_certificate /etc/letsencrypt/live/domain.tld/fullchain.pem; ssl_certificate_key /etc/letsencrypt/live/domain.tld/privkey.pem; ssl_dhparam /etc/letsencrypt/dhparam.pem; ssl_buffer_size 8k; ssl_protocols TLSv1.2 TLSv1.3; ssl_ciphers ECDH+AESGCM:ECDH+AES256:ECDH+AES128:DH+3DES:!ADH:!AECDH:!MD5; ssl_prefer_server_ciphers on; ssl_ecdh_curve secp384r1; ssl_session_tickets off; ssl_stapling on; ssl_stapling_verify on; resolver 8.8.8.8; add_header Strict-Transport-Security 'max-age=31536000; includeSubDomains; preload'; if ($host != domain.tld) { return 307 https://domain.tld$request_uri; } }
Next, update /core/ServiceProviders/MinphpBridge.php and make the following change:
Code Block // $htaccess = file_exists($rootWebDir . '.htaccess'); $htaccess = true;
Lighttpd
- This sample configuration is community provided:
Edit lighttpd.conf
Code Block server.modules += ( "mod_redirect") server.modules += ( "mod_rewrite") #if blesta install is http://<mydomain>.<mytld>/clients/ url.rewrite-if-not-file = ( "^/clients/(.*)$" => "/clients/index.php" ) url.redirect = ( "^(.*)/clients/install.php$" => "$1/clients/install/" )
Cron Issues
- Cron does not seem to complete normally and Settings > Company > Automation shows some hung tasks.
- Try disabling your cron job, and running the cron manually under Settings > System > Automation. If it runs correctly, you may have a memory issue in your CLI environment with Zend Memory Manager. Some users have reported that appending export USE_ZEND_ALLOC=0; to the beginning of their cron job resolved the issue. When using this method, your cron may look something like this: export USE_ZEND_ALLOC=0; /usr/bin/php /home/user/public_html/blesta/index.php cron
Cloudflare
- Widgets do not appear in the client or admin areas, CSS or Javascript does not appear to load or Blesta doesn't look right.
- Disable Rocket Loader and Auto Minify within Cloudflare. We would recommend not using Cloudflare for Blesta at all if possible.
License Validation Issues
- License does not seem to validate. I've confirmed that port 443 egress is open at my firewall at Curl SSL is installed.
- Make sure mbstring.func_overload is off in your php.ini. Overloading single byte functions with mbstring multibyte functions will prevent encryption from working properly and your license will not validate.
- Make sure that System.debug is set to false in your ~/config/blesta.php config file (Blesta 4.0+ only). It should appear as: Configure::set("System.debug", false);